Midi Router Client
Create routes from anywhere to anywhere
Midi Router Client is an advanced, cross-platform tool designed to route and manipulate MIDI signals in real time. It allows users to create virtual MIDI ports, map MIDI events (e.g., CC to pitch wheel), monitor inputs, and build custom controls like program change dropdowns—all with minimal latency
Homepage: https://sourceforge.net/projects/midi-router-client/
Github and support: https://github.com/shemeshg/MidiRouterClient
Getting Started
Welcome to MIDI Router Client! This guide walks you through the core concepts and gets you routing MIDI in under 10 minutes.
The Big Picture
MIDI Router Client works around three key concepts:
- Presets — Collections of routing rules and controls grouped together
- Routes — Instructions for how MIDI data flows from input to output
- User Controls — On-screen sliders and dropdowns that send MIDI commands
Typical workflow: Install → Create Preset → Add Route (EasyConfig) → Add User Controls → Test & Deploy
Tag‑Based Filtering with Regex and :Label shortcuts
Adding tags like :midi, :arp, or :mix inside a description automatically creates quick‑access buttons that populate the filter field,
allowing fast navigation through large routing configurations.
Use R‑click → Tag to open the tag‑editing popup.
Step 1: Install MIDI Router Client
Choose your platform:
- Windows: Use scoop
- macOS: Use Homebrew
- Linux: Download prebuilt packages
Step 2: Create Your First Preset
A preset is where you store everything: routes, controls, and port settings.
- Open MIDI Router Client
- Navigate to the Presets tab
- Click New Preset and name it (e.g., “My First Setup”) or use the default one already created with a fresh startup.
- (Optional) Set activation mode to “select” for MIDI-triggered preset switching
✅ Done! Your preset is ready to use. Now it’s time to route MIDI.
Step 3: Create Your First Route
For beginners, use EasyConfig instead of manually building routes—it’s much simpler.
- Navigate to the In Ports tab
- Select your connected MIDI input device
- Click EasyConfig (not Routes)
- Follow the guided setup:
- Choose your input device
- Choose your output destination
- (Optional) Select which MIDI messages to filter or transform (e.g., CC, Note On)
Want to learn the advanced way? Once you’ve created an EasyConfig, inspect the generated Route to see how it works. This reverse-engineering method is the fastest way to master routes.
Step 4: Add User Controls (Optional)
User controls are interactive sliders and dropdowns on-screen.
- Navigate to User Controls
- Click New Control
- Choose a type (Slider, Dropdown, etc.)
- Configure which MIDI message it sends (CC, Program Change, NRPN)
- Set the range and labels
Now you can trigger MIDI commands with a mouse click or touch.
Step 5: Test & Debug
Use Monitoring to verify MIDI data:
- Go to In Ports tab
- Select your input device
- Click Monitoring in current or external dialog window.
- Send MIDI to your input — you should see messages logged in real-time
Troubleshooting tips:
- MIDI clock messages appearing as junk? Enable “Ignore MIDI Clock” in Port Settings
- 14-bit CC values showing as two separate messages? Use “14-bit CC Translation” in port settings
- Not sure what that NRPN is? Monitoring translates it to human-readable format
Next Steps
Now that you have a basic setup working:
- Learn Routes deeply: Read Route documentation for filter types and advanced configurations
- Master Presets: Check out Preset activation modes for MIDI-triggered switching
- Advanced Routing: Explore Configuration options for remote servers and clock manipulation
- Reference: Consult the complete filter reference for all available transformations
Common Scenarios
Scenario 1: Route a Keyboard to a Synth
- Create a preset named “Keyboard → Synth”
- Use EasyConfig to map your keyboard input to the synth output
- EasyConfig will route all events by default
- ✅ Done! Press keys on your keyboard to control the synth
Scenario 2: Create a Custom Mixer with Sliders
- Create a preset
- Add a route forwarding CC messages
- In User Controls, add sliders ex. (CC 7, 10, 11, etc.)
- Label them (Volume, Pan, Reverb, etc.)
- ✅ Now control multiple parameters with on-screen sliders
Scenario 3: Switch Setups with MIDI
- Create multiple presets (e.g., “Rock Setup”, “Jazz Setup”)
- In each preset, set activation mode to “select”
- Assign a Program Change number to trigger each preset
- ✅ Send Program Change from your controller to instantly switch presets
Need Help?
- Confused by a term? Check the Glossary
- Looking for a specific feature? Browse the Complete Reference
- Want to understand the technical details? Read Configuration
- Advanced users? See Advanced: CLI Reference for automation
Installation Guide
Windows
Install via scoop https://github.com/shemeshg/scoop-bucket
remove winget install if exists winget:
winget remove Shemeshg.MidiRouterClient
Install scoop
Set-ExecutionPolicy RemoteSigned -Scope CurrentUser
irm get.scoop.sh | iex
add bucket
scoop bucket add extras
scoop bucket add shemeshg https://github.com/shemeshg/scoop-bucket
install app
scoop install midi-router-client
keep updated with
scoop update *
Also see Windows Service
macOS
Install via Homebrew:
brew remove --cask midi-router-client
brew tap shemeshg/tap
brew trust shemeshg/tap
brew install --cask shemeshg/homebrew-tap/midi-router-client
codesign --force --deep --sign - /Applications/midi-router-client.app/
xattr -c /Applications/midi-router-client.app/
Note: macOS requires manual code signing and removal of extended attributes to ensure proper execution.
Linux
Prebuilt .zip and .deb packages are available, targeting the oldest supported Ubuntu LTS at the time of release.
⚠️ Additional Notes
- Distributed binaries are not code-signed.
Windows Service
In most situations, you don’t need to install it as a service.
MidiRouterClient CLI / Windows Service
run as administrator
scoop install -g midi-router-client-cli
keep updated with
# as admin, this will also update all user scoop apps
scoop update -g --all
After installation, it is possible to start the service from an elevated shell:
sc start MidiRouterClientCli
⚠️ MidiRouterClient Windows Service Configuration Files
Windows services do not use the same AppData folder as your logged-in user.
This means the GUI/CLI app and the background service each store their configuration in different locations.
It is possible to change the service’s Run As account at windows service manager to your own user to avoid this issue entirely.
Additionally, if the service version does not match the GUI version, configuration corruption and data loss may occur.
The service’s startup sequence may also depend on the internal midisrv component.
Adding midisrv as a service dependency can be helpful, especially when modern MIDI 2.0 virtual ports are defined.
🧍 Normal application (GUI or CLI run manually)
Your user-level configuration is stored here:
C:\Users\<YourUser>\AppData\Roaming\shemeshg\MidiRouterClient.ini
🖥️ Windows service (running as LocalSystem)
The service runs under the system account, which has its own profile.
Its configuration file is stored here:
C:\Windows\System32\config\systemprofile\AppData\Roaming\shemeshg\MidiRouterClient.ini
C:\Windows\System32\config\systemprofile\AppData\Local\midiRouterClient.json
This is the file the service reads — for example, to determine which port to listen on.
📌 Why this matters
- Editing the user INI file does not affect the service
- Editing the service INI file does not affect your user app
- If you want the service to use the same settings as your user app, you must manually copy or edit the service’s INI file in the
systemprofiledirectory
MIDI Configuration Overview
TL;DR: Presets bundle routing rules and user controls. Configuration auto-saves to JSON. Use the Login tab or ⋮ menu to access and backup your configuration file.
This document describes how configuration, presets, routing, and user-control dropdowns work within the application. It also explains how configuration is stored and how users can manage it through the interface.
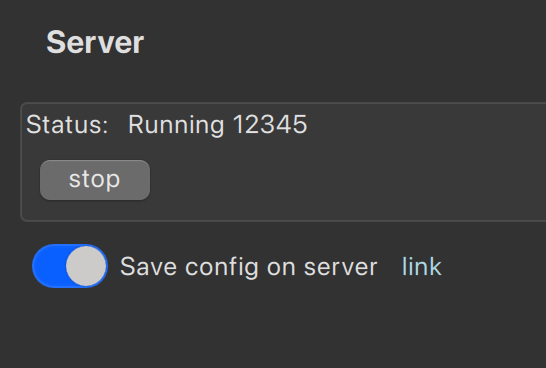
Login Tab
The application uses a client–server model and auto-connects to a local port. Most users won’t need to adjust this, but in complex networks,*connection bookmarks simplify connecting to remote servers.
Modern operating systems support mDNS, so connecting to machine.local is usually straightforward.
All communication uses TCP websocket and not RTP MIDI UDP.
Each machine has its own configuration. To trigger a preset on a remote server, create a preset there that responds to a MIDI command, then send that command from a local User Control through a local virtual port routed to the remote destination.
Connected Inputs and Outputs
The configuration includes a list of all currently active MIDI ports.
These ports may be physical or virtual (where supported).
Presets
Presets store settings for both connected and disconnected ports. A preset may include:
- Routing definitions
- User control mappings (sliders, dropdowns, etc.)
Presets allow you to quickly restore a complete setup without manually reconfiguring each port.
Dropdowns
Dropdowns allow users to select values using friendly labels.
A label may also contain embedded MIDI commands, which override the default user-control behavior.
How Dropdowns Work
- Dropdown items are generated from the User Control definition
- A label may optionally include one or more embedded MIDI instructions
- When embedded commands are detected, the normal User Control action is skipped
- Instead, the embedded MIDI messages are sent immediately
See Supported Dropdown Embedded Commands for syntax.
Virtual Ports
Virtual MIDI ports can be used for internal routing.
⚠️ Limitations:
- Not supported on Windows however it is possible to create virtual ports using the modern Windows 11 MIDI 2.0 interface
- On macOS, virtual ports created outside Audio MIDI Setup may filter
sysexmessages
Persisting Configuration
Configuration is stored in a json file. Because the schema may change between versions, it is recommended to back up your configuration regularly.
Automatic Load/Save
The Login tab allows you to:
- Load configuration when the application starts
- Save when the application closes
- Auto-save when changes are applied (with throttling)
Accessing the Configuration File
Clicking the link in the Login tab opens the server folder where the JSON configuration is stored.
You can copy this file for backup or migration.
Additional Options
The ⋮ (menu) button provides:
- About — Application information and version
- Download/Upload/Apply — Manage configuration across machines
- Accessibility — Adjust font size
- UI Preferences — Monitor settings
CLI Options (Advanced)
📌 Note: CLI available on macOS/Linux (included). Windows users: Install via
scoop install -g midi-router-client-cli
Useful for automation and headless deployments. For example:
./midi-router-client --apply --preset-name "main"
Since the application does not automatically re-apply when MIDI devices disconnect/reconnect, CLI preset application is handy for scripting.
See Advanced: CLI Reference for complete CLI documentation including headless mode and remote server control.
Screenshots
Figure 1: Settings Dialog
Access font sizes, UI preferences, and application settings.
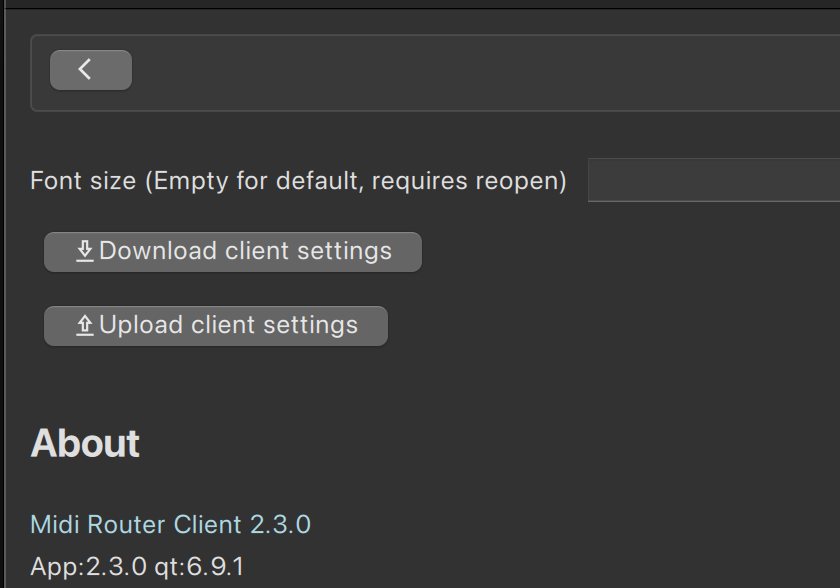
Figure 2: Login Tab
Load, save, and apply presets; access configuration files; manage remote server connections.
See Also
- Getting Started — Quick onboarding guide
- Presets — Manage preset activation modes
- Advanced: CLI Reference — Automation and remote control
- Glossary — MIDI terminology reference
Supported Dropdown Embedded Commands
A dropdown label may include any of the following tokens.
They can appear anywhere, in any order, and the system will automatically detect and schedule them.
Quick Cheat‑Sheet
You can embed commands directly inside dropdown labels.
Everything after | is hidden from the visible label.
Supported tokens:
CC-x-y→ Control ChangePC-x→ Program ChangeNRPN-x-y→ NRPN parameterNOTE-ON-x-y/NOTE-OFF-x-y→ Play/stop notesRAW-xx_xx_xx→ Raw MIDI bytesWAIT-x→ Delay next command(s)PRE-ANY ...→ Commands before main actionPOST-ANY ...→ Commands after main actionBTN-x→ Quick‑access button
Line continuation:
Prefix a line with .. to join it with the previous one.
Example:
Preset 1
.. hellow
.. | NOTE-ON-41-28
Preset 2
..world
..| NOTE-ON-42-28
Becomes:
Preset 1 hellow | NOTE-ON-41-28
Preset 2 world | NOTE-ON-42-28
MIDI Control Commands
| Token | Meaning |
|---|---|
CC-x-y | Send Control Change x with value y |
PC-x | Send Program Change x |
NRPN-x-y | Send NRPN parameter x with value y |
Note Commands
| Token | Meaning |
|---|---|
NOTE-ON-x-y | Play note x with velocity y |
NOTE-OFF-x-y | Stop note x with velocity y |
Raw MIDI Message
| Token | Meaning |
|---|---|
RAW-x | Send a raw MIDI message, where x is a sequence of hex bytes separated by underscores |
Examples
RAW-90_3C_64
- 90 → Note On, Channel 1
- 3C → Note 60 (Middle C)
- 64 → Velocity 100
RAW-F0_7E_7F_09_01_F7
Sends a SysEx message.
Timing Commands
| Token | Meaning |
|---|---|
WAIT-x | Delay the next command(s) by x ms |
Notes
- WAIT does not block the UI or server thread.
- Delays accumulate:
WAIT-100 WAIT-200 → total delay = 300 ms
- Commands scheduled for the same timestamp execute in label order.
PRE-ANY and POST-ANY
Dropdown entries beginning with PRE-ANY or POST-ANY define additional commands that run before or after the main dropdown command.
Use cases include:
- Resetting LED indicators
- Preparing controller state
- Cleanup actions after the main command
These tokens never appear in the visible dropdown label.
Quick-Access Button Token
| Token | Meaning |
|---|---|
BTN-x | Adds a quick-access button with sort order x |
Details
- Clicking the button instantly selects that dropdown item.
- If ordering doesn’t matter, use
BTN-0for all.
Examples
Program Change with Bank Select
Item 0, default send zero for whatever is defined in user control
Item 1, that sends program change | CC-0-5 CC-32-0 PC-3
Item 1 sends:
CC 0 → 5(Bank Select MSB)CC 32 → 0(Bank Select LSB)PC 3(Program Change)
Control surface indication on preset change.
PRE-ANY NOTE-ON-41-0 NOTE-ON-42-0
Preset 1 | NOTE-ON-41-28
Preset 2 | NOTE-ON-42-28
Notes + Timing Example
NOTE-ON-60-100 WAIT-500 NOTE-OFF-60-50
Sequence:
- Play note 60 at velocity 100
- Wait 500 ms
- Stop note 60 at velocity 50
Presets
Presets are containers for user-defined input configurations. They can be activated via mouse click or MIDI event, offering flexible and dynamic control.
Each preset holds its own distinct settings across all available input channels.
Usage Notes
While multiple presets can be active at once, it’s generally recommended to use only one at a time—especially when applying advanced input configurations such as 14-bit resolution or clock routing.
Using a single preset helps maintain clarity and avoids potential conflicts between overlapping input settings.
MIDI Preset Activation Modes
when the assigned MIDI event is received
- select — Activates the selected preset and disables all others.
- toggle — Enables or disables the current preset.
- on — Enables the preset.
- off — Disables the preset.
Screenshots
Figure 1: Presets List
All available presets with activation modes and current status.
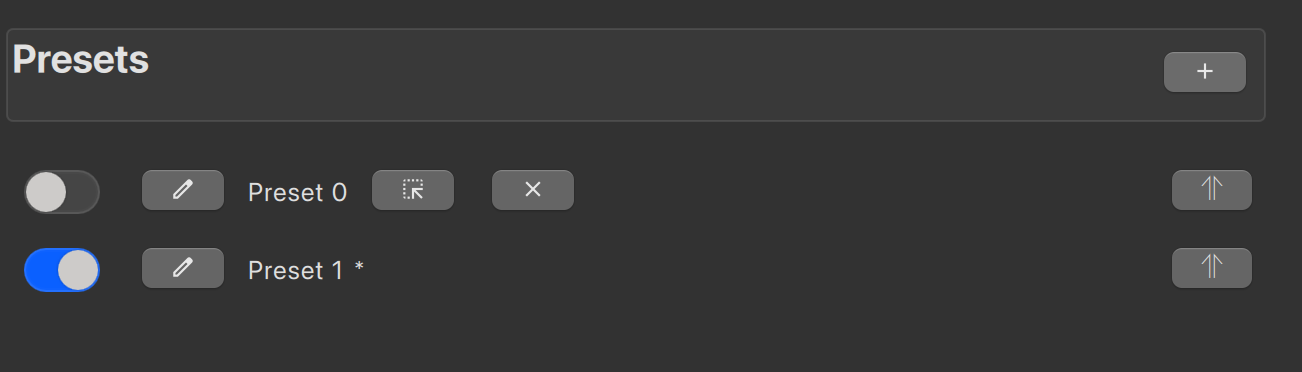
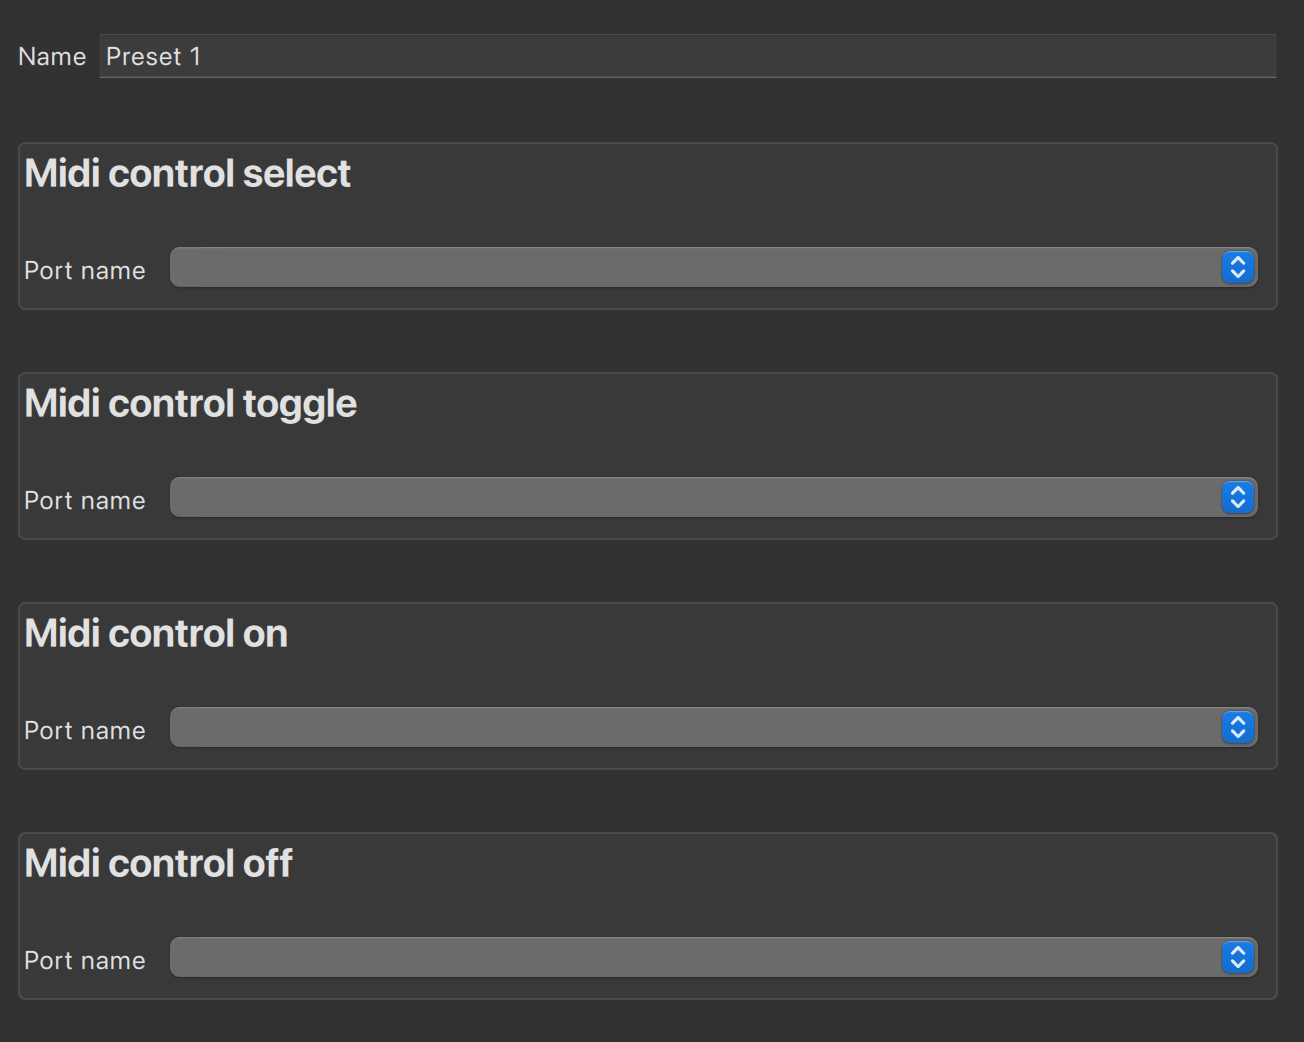
Figure 2: Preset Details
Configuration view for a specific preset, including routes and user controls.
See Also
- Getting Started — Quick onboarding guide
- Configuration — Manage presets and settings
- User Controls — Add sliders and dropdowns to presets
- Routes — Advanced routing within presets
Input Ports
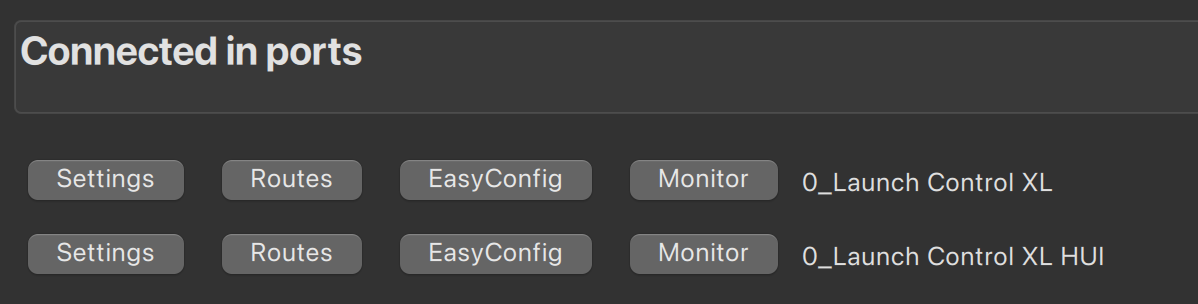
The In Ports tab is where you configure how MIDI inputs are processed and routed.
Overview
Only ports that are currently connected will be shown. The In Ports tab has three main functions:
- Port Settings — Filter message types, configure MIDI clock, enable 14-bit translation
- Monitoring — Inspect incoming MIDI messages in real-time
- Routing — Create or configure routes for incoming data
Note: All settings are preset-specific. Different presets can have different configurations for the same port.
Quick Links
- 📊 Port Settings — Configure message filtering and value translation
- 🔍 Monitoring — Real-time MIDI inspection and debugging
Routing Options
You can set up routing in two ways:
EasyConfig (Recommended for Beginners)
A simple, guided tool that helps you create routing setups without needing to dive into technical details. Perfect for learning.
Best for:
- First-time setups
- Simple A-to-B routing
- Quick testing
Routes (Advanced)
Full control over routing configurations. Build custom filter chains, transformations, and complex workflows.
Best for:
- Custom transformations
- Multi-stage processing
- Scheduling and advanced features
How they work together: EasyConfig automatically generates a full Route behind the scenes. After creating an EasyConfig, inspect the generated Route to understand advanced concepts.
Getting Started
- Select an input port from the list
- (Optional) Adjust Port Settings for filtering/translation
- (Optional) Use Monitoring to verify data arrival
- Create a route using EasyConfig or Routes
- Test with Monitoring
See Also
Port Settings
Configure how your MIDI input ports handle incoming messages.
Overview
Port settings control message filtering, clock handling, and value translation at the input level. Changes to settings apply only to the active and selected preset’s input port.
Note: Settings are preset-specific. Different presets can have different configurations for the same port.
Key Settings
Ignore Message Types
Select which types of MIDI messages to discard at the input:
- Sencee — Device connected indication
- MIDI Clock — Timing synchronization signals
- Sysex — Manufacturer-specific commands
Tip: Enable “Ignore MIDI Clock” if your device floods the log with timing data and you’re not using tempo sync.
MIDI Clock Settings
Configure how MIDI Clock and Song Position Pointer (SPP) messages are processed.
Options
- Convert SPP to time signature — Translate song position into bar/beat notation
- Propagate clock - Propagate to other inputs
Use case: When syncing multiple devices based on selected clock
14-bit CC Translation
Convert dual CC messages (MSB/LSB) into higher-resolution formats.
When to Use
- Converting 14-bit CC to Pitch Wheel for finer pitch control
- Mapping 14-bit CCs to NRPN values for parameter precision
- Increasing resolution from 0–127 to 0–16,383 (though internaly represented as float 0..127)
Screenshots
Figure 1: Port Settings Configuration
Toggle message types, configure MIDI clock, and enable 14-bit translation.
Common Workflows
Workflow 1: Filter Out Timing Noise
Many devices send constant MIDI Clock signals, cluttering the interface.
- Select your input port
- Enable “Ignore MIDI Clock”
- Clock messages are now discarded
- ✅ Cleaner monitoring and debugging
Workflow 2: Enable High-Resolution Control
Route a 14-bit CC fader to pitch wheel for smoother control.
- Select input device
- Enable “14-bit CC Translation”
- Choose source CCs (e.g., CC 7, this will also use CC 39 automaticlly)
- Choose target format (e.g., Pitch Wheel)
- ✅ Fader now controls pitch smoothly
See Also
- Monitoring — Inspect incoming messages in real-time
- In Ports Overview
- Glossary: MIDI Clock, SPP, 14-bit CC
Monitoring MIDI Messages
Debug and inspect incoming MIDI data in real-time.
Overview
The Monitoring view shows all MIDI messages arriving at the selected input port, translating complex MIDI data into a readable format for quick, intuitive troubleshooting. You can also open the monitor in a separate window to keep it visible while working elsewhere in the app.
Monitoring can additionally be enabled by inserting a monitor filter anywhere in the chain. Since it behaves like any other filter, it lets you inspect or debug the flow without altering the chain’s logic. Output can be sent either to the server console or to the client where the input originates, giving you flexibility in how and where you observe activity.
How to Use
- Navigate to the In Ports tab
- Select your input device from the port list
- Click Monitoring
What You’ll See
Simple Messages
{
    "channel": 1,
    "command": 8,
    "commandStr": "noteoff",
    "data": [
        128,
        73,
        0
    ],
    "data1": 73,
    "data2": 0,
    "deltatime": 0.18201804100000002,
    "msgtype": 0,
    "nrpnControl": -1,
    "nrpnData": -1,
    "portName": "0_Launch Control XL",
    "portNumber": 1,
    "userdata": "{\n    \"action\": \"monitor\"\n}\n"
}
Using Monitor for Setup Verification
Before building complex routes, use monitoring to confirm:
- Input device is recognized
- MIDI data arrives without errors
- Message types match expectations
- Value ranges are correct
- No timing issues.
- Debig custom
chain filters.
Performance Tips
- Monitoring can be CPU-intensive with high-frequency data (e.g., MIDI Clock)
- Disable MIDI Clock in Port Settings to reduce logging overhead
- Close monitoring when not actively debugging
See Also
- Port Settings — Configure message filtering and translation
- In Ports Overview
- Glossary: MIDI Message Types
EasyConfig Overview
EasyConfig makes MIDI routing simple and approachable—no need to dive into complex low-level setup.
The interface is organized into two main tabs: Routes and Split, each designed to help you configure your MIDI setup quickly and efficiently.
EasyConfig Routes
Destination Setup
You can route MIDI data to either:
- A local output name, or
- A network destination using the format:
<address>:<port>/<destinationName>
To make remote setup easier, there’s a Query button that checks if the remote port is available and confirms connectivity.
All network communication uses WebSocket over TCP, ensuring reliable data transfer.
Keyboard Split
The Split tab lets you define a split point on your keyboard—this divides it into separate zones. This is especially useful for setting up layered instruments or assigning different sounds to different parts of the keyboard.
Once zones are created, you can assign them as sources for note on/off events (when a key is pressed or released)
Screenshots
Figure 1: Keyboard Split Configuration
Define split points to divide the keyboard into separate control zones.
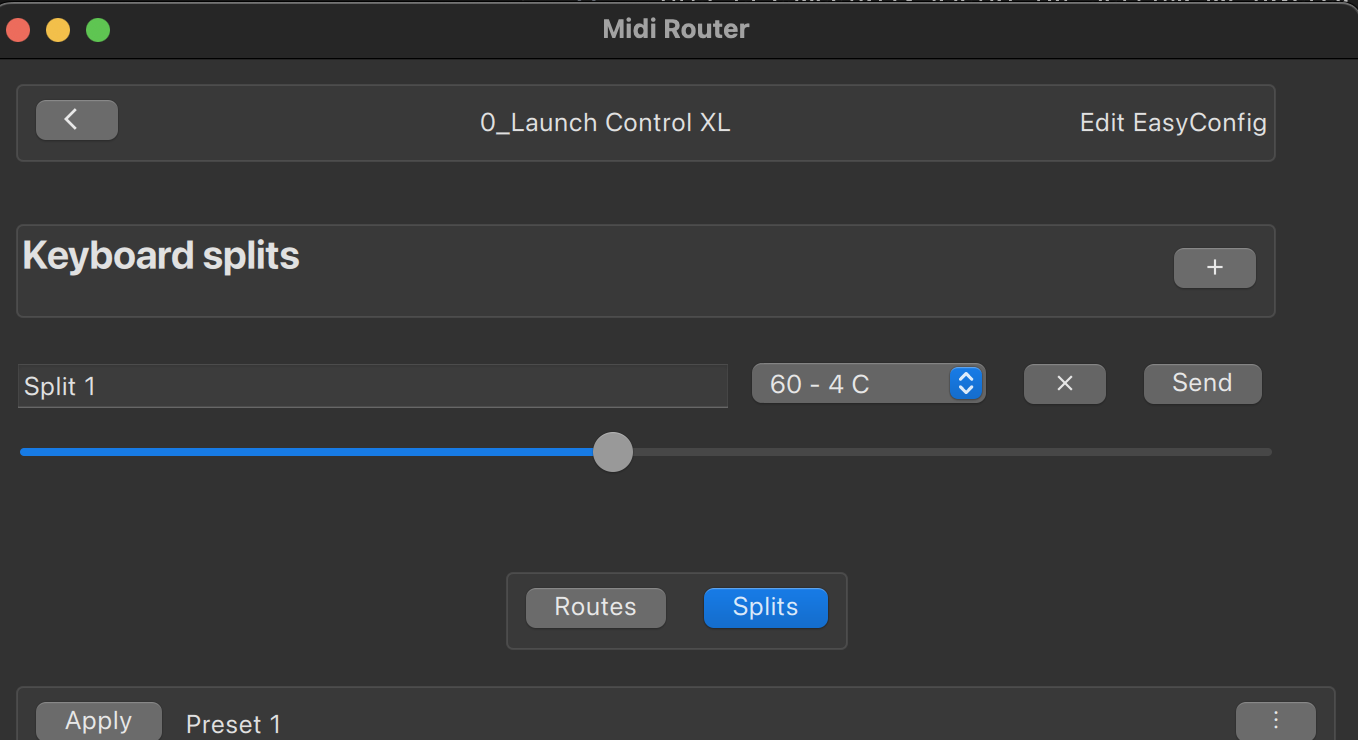
Figure 2: EasyConfig Main Interface
Simple guided setup for creating basic routes.
See Also
- Getting Started — Quick onboarding guide
- Routes — Advanced routing after learning EasyConfig
- Input Ports — Manage MIDI input sources
- Glossary — MIDI terminology reference
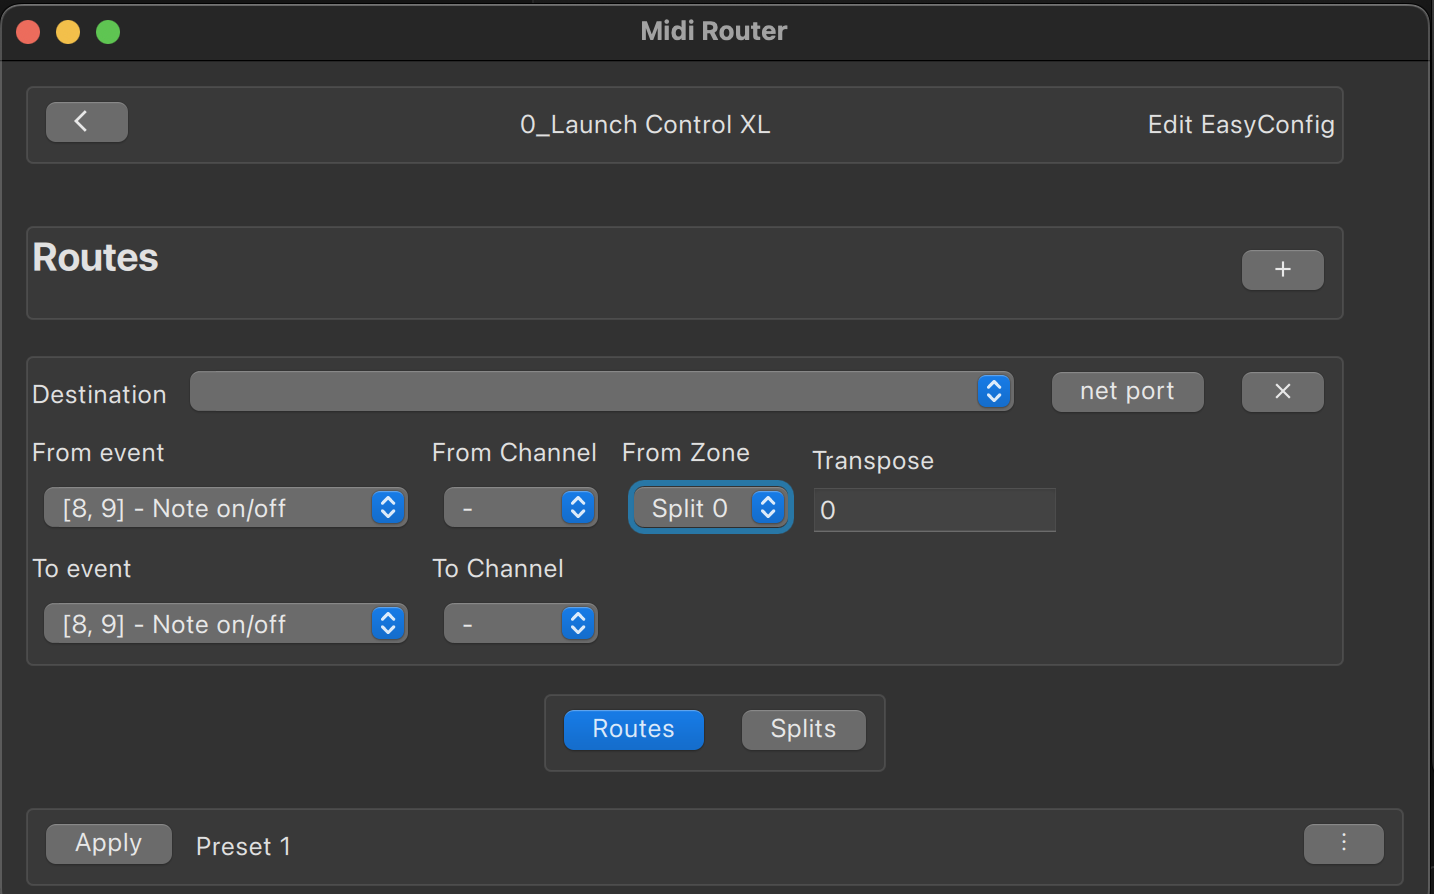
Route
TL;DR: Routes are sequences of chains, each containing filters that transform MIDI data. Start with EasyConfig to learn by example, then inspect the generated Route.
A Route is a container for multiple chains, enabling modular and sequential processing of MIDI data.
Learning to Create Routes
If you’re trying to understand how routes are built, the easiest way is to start with an EasyConfig. Once you’ve created one, inspect how it’s automatically translated into a full route. This reverse-engineering method offers a hands-on, intuitive way to grasp the structure and logic of route creation—without needing to dive into low-level details right away.
Common Scenarios
Scenario 1: Route Keyboard to Synthesizer
Goal: Send all MIDI from keyboard to synth output
Setup:
- Use EasyConfig
- Input: Keyboard
- Output: Synthesizer (MIDI destination)
Result: Every key press and control movement on keyboard goes to synth.
Scenario 2: Transform CC to Pitch Wheel
Goal: Convert a slider (CC 11) into pitch wheel data for smoother control
Setup:
- Create a filter with type
FILTER_AND_TRANSFORM - Set
filterEvent[[11,14]] - Route output to synth
Pro tip: Enable “14-bit CC Translation” in Port Settings if your controller sends dual CC messages for higher resolution.
Result: Slider now controls pitch smoothly instead of in 127 discrete steps.
Scenario 3: Schedule Notes for Quantized Playback
Goal: Record MIDI notes and play them back on the next bar boundary
Setup:
- Create a route with
SCHEDULE_TOfilter - Set
deferredTypetoQUANTIZE_BAR(align to nearest bar) - Ensure MIDI clock is being received
- Route output to instrument
Result: Notes are held and released on quantized grid positions.
Chains
A chain defines a linear path composed of a sequence of filters. Each filter performs a specific transformation or analysis on the MIDI stream. Filters execute in order, so output of one filter becomes input to the next.
Filter Types
TO_MIDI_DESTINATION
Routes MIDI events to a specific local MIDI destination.
Use case: Send keyboard MIDI to a synthesizer, sampler, or drum machine.
TO_CONSOLE
Logs MIDI events to the console (either server or client). This filter is also used for inter-server communication, such as sending logged MIDI messages to a client or triggering preset changes via MIDI.
Use case: Debug routing issues, send MIDI to remote servers.
TO_NETWORK
Sends all MIDI events to a remote destination over the network.
Use case: Route MIDI to another computer running MIDI Router Client Server.
SCHEDULE_TO
Holds MIDI events and schedules them for future delivery based on deferredType and deferredTo parameters. Requires MIDI clock events to function properly.
Use case: Quantize notes to beat grid, delay messages by bar count.
FILTER_AND_TRANSFORM
Allows both filtering and transforming MIDI event data. Advanced value mapping for precise control.
Use case: Convert CC ranges, filter specific channels, map Note On to CC, etc.
Transformation notation:
[[fromStart, fromEnd, toStart, toEnd]]— Maps a range fromfromStarttofromEndontotoStarttotoEnd[[fromStart, fromEnd, toStart]]— Short form wheretoEnd = toStart + (fromEnd - fromStart)[[value1, value2]]— Mapsvalue1tovalue2[[value]]— Equivalent to[[value, value]], a single value mapping
SWITCH_DATA1_DATA2
Swap data1 and data2, or swap NRPN control and NRPN data when using NRPN.
Use case: Route Note On key values to CC data, swap NRPN parameters.
📚 Reference: Detailed Parameters
Filter Type 0: TO_MIDI_DESTINATION
Parameters:
filterType:0midiInputName: Name of the MIDI input port
Filter Type 1: TO_CONSOLE
Parameters:
filterType:1logTo: Logging destination0(CLIENT): Client console1(SERVER): Server console
userdata: Optional user-defined JSON data
Filter Type 2: TO_NETWORK
Parameters:
filterType:2midiInputName: MIDI input port nameserverName: Target server nameserverPort: Target server port
Filter Type 3: SCHEDULE_TO
Parameters:
filterType:3deferredType: Scheduling mode0: IN_SPP (relative to Song Position Pointer)1: IN_BAR (relative to current bar)2: AT_SPP (specific SPP)3: AT_BAR (specific bar)4: QUANTIZE_SPP (nearest SPP)5: QUANTIZE_BAR (nearest bar)
deferredTo: Number of units to defer
Filter Type 4: FILTER_AND_TRANSFORM
Parameters:
conditionAction: Event deletion logic0: DO_NOT_DELETE1: DELETE_IF_NOT_MET_CONDITION2: DELETE_IF_MET_CONDITION
filterChannel: MIDI channel filterfilterData1: Data1 byte filter/transformfilterData2: Data2 byte filter/transformfilterEvents: MIDI event types to filter (e.g.,[8]for Note On)filterType:4name: Filter name
Filter Type 5: SWITCH_DATA1_DATA2
Parameters:
filterType:5switchMode: Swap behavior0: Swap data1 and data21: Swap NRPN MSB and LSB
See Also
- Getting Started — Quick onboarding guide
- Input Ports — Port settings and monitoring
- EasyConfig — Simplified route builder
- Glossary — MIDI terminology reference
Filter Type 5: SWITCH_DATA1_DATA2
User Controls
Each preset can include interactive controls such as sliders, optionally paired with dropdown menus.
User controls can be programmed to trigger MIDI messages to any port when the Midi Router Client receives program changes
Only the controls associated with the currently selected preset are displayed.
These controls send MIDI events to a predefined local port. The following MIDI event types are supported:
- Control Change (CC)
- Program Change
- NRPN (Non-Registered Parameter Number)
The is64Mode flag interprets the value 64 as the center or zero point, commonly used for bipolar ranges.
Dropdowns can also be used to store and select predefined preset names or send custom commands.
Screenshots
Figure 1: User Controls Panel
The main controls view showing available sliders and dropdowns for the active preset.
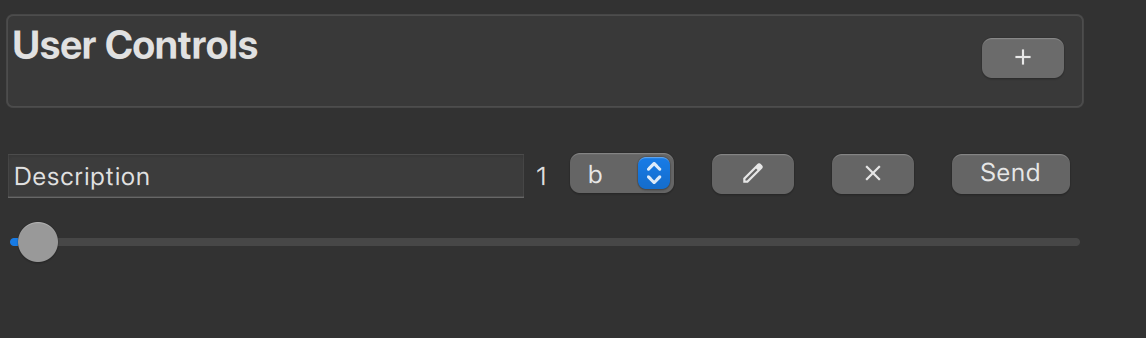
Figure 2: Individual Control Configuration
Detailed settings for a single control (e.g., CC range mapping, event type).

See Also
- Getting Started — Quick onboarding guide
- Presets — Organize controls in presets
- Supported Dropdown Commands — Advanced dropdown features
- Glossary — MIDI terminology reference
Reference
Event Types
The value used at the json mapped to midi event id
[
  { "value": 0, "text": "[] - -" },
  { "value": 1, "text": "[8, 9] - Note on/off" },
  { "value": 2, "text": "[9] - Note off" },
  { "value": 3, "text": "[8] - Note on" },
  { "value": 4, "text": "[10] - Key Aftertouch" },
  { "value": 5, "text": "[11] - Control Change" },
  { "value": 7, "text": "[100] - NRPN" },
  { "value": 8, "text": "[12] - Program Change" },
  { "value": 9, "text": "[13] - Channel Aftertouch" },
  { "value": 10, "text": "[14] - Pitch Bend" }
]
Preset configuration example
Users aren’t expected to manually edit or create json files—this example is provided solely to help you understand the configuration structure.
As the configuration grows, it may become increasingly difficult to grasp its overall purpose. It’s recommended to maintain a separate README file outside the app to document and explain your configuration.
Routing a Control Change (CC) event to NRPN, using channel 6 for both, and mapping a value range from 0–127 to 0–255.
{
  "midiRoutePresets": [
    {
      "midiRouteInputs": [
        {
          "midiInputName": "0_Launch Control XL",
          "easyConfig": {
            "easyConfigRoutes": [
              {
                "fromCcOrNrpnEnd": 127,
                "fromCcOrNrpnStart": 0,
                "fromChannel": 6,
                "fromData1": -1,
                "fromSelectedMidiEventTypeId": 5,
                "splitRangeId": -1,
                "toCcOrNrpnEnd": 255,
                "toCcOrNrpnStart": 0,
                "toChannel": 6,
                "toData1": 8,
                "toDestinationName": "localhost:12345/0_Scarlett 2i4 USB",
                "toSelectedMidiEventTypeId": 7,
                "transpose": 0,
                "uuid": "d3bc0cb8-0de6-43ec-94c5-91b4a6ed7c6d"
              }
            ],
            "keyboardSplits": [],
            "zoneNames": []
          }
        }
      ]
    }
  ]
}
List of Midi CC commands
Some of these commands may be reserved, although certain devices might not reserve them at all and instead use them for different functions. The following list represents a common convention, but individual devices are not strictly required to adhere to it.
bankselectcoarse: 0,
modulationwheelcoarse: 1,
breathcontrollercoarse: 2,
footcontrollercoarse: 4,
portamentotimecoarse: 5,
dataentrycoarse: 6,
volumecoarse: 7,
balancecoarse: 8,
pancoarse: 10,
expressioncoarse: 11,
effectcontrol1coarse: 12,
effectcontrol2coarse: 13,
generalpurposeslider1: 16,
generalpurposeslider2: 17,
generalpurposeslider3: 18,
generalpurposeslider4: 19,
bankselectfine: 32,
modulationwheelfine: 33,
breathcontrollerfine: 34,
footcontrollerfine: 36,
portamentotimefine: 37,
dataentryfine: 38,
volumefine: 39,
balancefine: 40,
panfine: 42,
expressionfine: 43,
effectcontrol1fine: 44,
effectcontrol2fine: 45,
holdpedal: 64,
portamento: 65,
sustenutopedal: 66,
softpedal: 67,
legatopedal: 68,
hold2pedal: 69,
soundvariation: 70,
resonance: 71,
soundreleasetime: 72,
soundattacktime: 73,
brightness: 74,
soundcontrol6: 75,
soundcontrol7: 76,
soundcontrol8: 77,
soundcontrol9: 78,
soundcontrol10: 79,
generalpurposebutton1: 80,
generalpurposebutton2: 81,
generalpurposebutton3: 82,
generalpurposebutton4: 83,
reverblevel: 91,
tremololevel: 92,
choruslevel: 93,
celestelevel: 94,
phaserlevel: 95,
databuttonincrement: 96,
databuttondecrement: 97,
nonregisteredparametercoarse: 98,
nonregisteredparameterfine: 99,
registeredparametercoarse: 100,
registeredparameterfine: 101
Runtime control of the server via Qt WebChannel
This capability is no more used by the GUI of the application. Instead, configuration is handled exclusively through submitted JSON files.
https://github.com/shemeshg/qwebchannelTypeScriptExample/blob/master/src/main.ts
Glossary
Quick reference for MIDI and application-specific terminology.
MIDI Concepts
CC (Control Change)
A MIDI message that conveys continuous control data (e.g., volume, expression). Each CC has a number (0–127) and a value (0–127). Often called “continuous controllers.”
Note On / Note Off
MIDI messages that represent playing a note. Note On includes note number (pitch) and velocity. Note Off indicates when the note is released.
Program Change (PC)
A MIDI message that selects a program or preset on a connected device. Values 0–127 represent different programs.
NRPN (Non-Registered Parameter Number)
A higher-resolution MIDI message for controlling parameters beyond standard CCs. Uses four bytes: NRPN MSB, NRPN LSB, Data MSB, Data LSB. Allows 16,384+ unique parameter addresses.
RPN (Registered Parameter Number)
Similar to NRPN but standardized. Examples include Pitch Bend Sensitivity (RPN 0) and fine/coarse tuning.
Pitch Bend
A continuous MIDI message for pitch shifting. Range: -8192 to +8191 (center = 0).
Aftertouch
MIDI messages sent after a key is pressed. Two types:
- Channel Aftertouch — Single value for entire keyboard
- Polyphonic Aftertouch — Individual value per note
MIDI Clock (Timing Clock)
Timing signal sent 24 times per quarter note, used to synchronize tempo across devices.
SPP (Song Position Pointer)
A MIDI message indicating playback position in a sequence. Sent 2 times per quarter note.
14-bit CC Resolution
Combining two standard 7-bit CCs (MSB and LSB) to achieve finer control. Allows 0–16,383 resolution instead of 0–127.
Sysex (System Exclusive)
Manufacturer-specific MIDI messages for device control. Format varies by manufacturer.
Application Concepts
Preset
A named collection of:
- Routing rules (Routes)
- Input port settings
- User controls (sliders, dropdowns)
Presets can be activated by mouse click, MIDI event, or program change.
Route
A processing pipeline for MIDI data. Contains one or more Chains, each with a sequence of Filters. Routes define how input MIDI is transformed and where it’s sent.
Chain
A linear sequence of filters within a route. MIDI flows through each filter in order.
Filter
A single transformation or routing rule. Examples:
- Route to MIDI destination
- Transform CC values
- Send to remote server
- Schedule for delayed playback
EasyConfig
Simplified UI for creating basic routes without writing filter definitions. Generates a full Route behind the scenes. Great for learning.
User Control
On-screen interactive element (slider, dropdown) that sends MIDI commands when manipulated. Associated with a specific preset.
Virtual MIDI Port
Software-based MIDI port created by the application (no physical hardware). Allows internal routing between software. Not supported on Windows 11 with MIDI 2.0.
Monitoring
Real-time inspection of incoming MIDI messages. Translates complex formats (NRPN, 14-bit CC) into human-readable labels.
Port Settings
Configuration for how a physical/virtual input port handles MIDI:
- Which message types to ignore
- How to handle MIDI clock
- 14-bit CC translation
- Others
Configuration File
JSON file storing the entire application state:
- All presets
- All routes
- User control definitions
- Connection bookmarks
Located in the server folder, accessible from the Login tab.
Headless Mode
Running the application without a GUI. Useful for server deployments or scripting. Activated via CLI flags.
Connection Bookmark
Saved connection profile for connecting to remote servers. Stores IP address and port.
Common Abbreviations
| Term | Full Name |
|---|---|
| CC | Control Change |
| PC | Program Change |
| NRPN | Non-Registered Parameter Number |
| RPN | Registered Parameter Number |
| SPP | Song Position Pointer |
| MSB | Most Significant Byte |
| LSB | Least Significant Byte |
| GUI | Graphical User Interface |
| CLI | Command-Line Interface |
Advanced: CLI Reference
Run MIDI Router Client from the command line for scripting, automation, and headless deployments.
Availability
- macOS and Linux: CLI included with application
- Windows: Install CLI tool via
scoop install -g midi-router-client-cli
Basic Syntax
./midi-router-client [options]
Options Reference
Information
| Option | Effect |
|---|---|
-h, --help | Display command-line help message |
--help-all | Display help including generic Qt options |
 /Applications/midi-router-client.app/Contents/MacOS/midi-router-client -h
Usage: /Applications/midi-router-client.app/Contents/MacOS/midi-router-client [options]

Options:
  -h, --help  Displays help on commandline options.
  --help-all  Displays help, including generic Qt options.
  --headless  Run in headless mode on the specified port by the gui.
               --config-file  <path>    Full path to config file.
               --server-port  <path>    serevr port.
  --apply     Apply a preset (local or remote).
               --address <address>      Remote address (ip:port).
               --preset-name <preset>   Preset name (regex) to apply, use "" to
              list presets
  --quit      Quit server (local or remote).
               --address <address>      Remote address (ip:port).
Headless Mode
./midi-router-client --headless
Runs the application without a GUI. Useful for server deployments or background automation.
Additional options for headless:
--config-file <path>— Full path to configuration file--server-port <port>— Server port number
Apply Preset
./midi-router-client --apply \
  --address <address> \
  --preset-name <preset>
Applies a preset on the local machine or remote server. Returns exit code 0 on success.
Parameters:
--address <address>— Remote address in formatip:port(e.g.,127.0.0.1:2222)--preset-name <preset>— Preset name or regex pattern; use""to list all presets
Examples
Example 1: List All Available Presets
./midi-router-client --apply --address 127.0.0.1:2222 --preset-name ""
Outputs all preset names available on the specified server.
Example 2: Apply a Specific Preset Locally
./midi-router-client --apply --preset-name "neutron"
Activates the “neutron” preset on the local machine.
Example 3: Apply a Preset on Remote Server
./midi-router-client --apply --address 192.168.1.100:2222 --preset-name "studio"
Activates the “studio” preset on a remote server at 192.168.1.100:2222.
Example 4: Start in Headless Mode
./midi-router-client --headless \
  --config-file /path/to/config.json \
  --server-port 2222
Starts the server without a GUI, loads the configuration, and listens on port 2222.
Exit Codes
| Code | Meaning |
|---|---|
0 | Success |
1 | Error or failure |
The exit code is particularly useful for scripting and automation — check it to verify if an --apply operation succeeded.
Use Cases
Use Case 1: Automated Preset Switching
Trigger preset changes from cron jobs or external scripts:
# Every hour at 30 minutes past, switch to "practice" preset
30 * * * * /path/to/midi-router-client --apply --preset-name "practice"
Use Case 2: Remote Server Management
Deploy MIDI Router Client on a headless server and control it remotely:
# On server:
./midi-router-client --headless --config-file config.json --server-port 2222

# From client machine:
./midi-router-client --apply --address server.local:2222 --preset-name "main"
Use Case 3: Script Validation
Verify preset application succeeded before proceeding:
#!/bin/bash
./midi-router-client --apply --preset-name "gig"
if [ $? -eq 0 ]; then
  echo "✅ Preset applied successfully"
else
  echo "❌ Preset application failed"
  exit 1
fi
See Also
SBOM
https://github.com/shemeshg/MidiRouterClient/blob/main/SBOM.md
LICENSE
https://github.com/shemeshg/MidiRouterClient/blob/main/LICENSE